Teacup Clock
This has been the longest project of my life. I have been working on it off and on since april. It just wasn't ever right.
Do you brilliant minds ever have stuff like this? But finally it got done. I wish I could say that I as the creative genius behind it but alas I am not. Erika @
Retropolitan Hip is. Her blog is awesome and she is my partner in crime in many an idea/business venture. She is probably the funniest person that I know and I love her so much! The inspiration piece:
Cute right? Its like $400.00 from Umbra
This lovely is Erika's version:
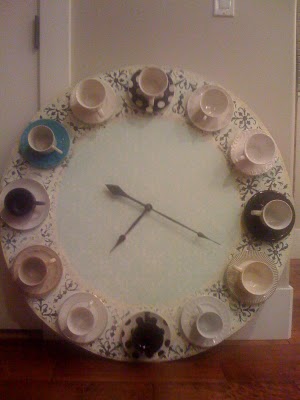
And this is mine:
The teacups were all found at antique stores, thrift stores, or TJ Maxx.
So do you want to make one too? Here are the steps:
1. FIND A CRAPLOAD OF CUPS! I have probably 6 more sets that I didn't use. You have to play with them and get them in the right spots so that it flows. It would be much easier if you were only doing a few colors but who likes to do things the easy way???! pfssh not this girl. After you have it set up the way you want number them!!! That way you wont forget!!
2. I got the wood at Homie D's. It was months ago so I don't remember how much I spent. Its just particle board. I stuck a pin in the board and attached a string and pencil to it and drew a circle. Then I had Macho cut it out for me.
3. I modpodged paper onto it. I hated it. So then I modpodged tissue paper onto it. eeeh. So then I painted it white. Much better.
4. Of course I covered the center mark. Awesome. I had to rediscover the center so I measured the width and marked the center point at a few different angles and it looked like this:
Then Macho drilled a hole for the clock mechanism. I just used one off a clock that I already had but I am sure you can buy stuff if you want to go the "expensive" route...ha ha ha.
5. I used Gorilla Glue Epoxy to epoxy all of the teacups to the saucers and then the saucers to the wood. Seriously this is the strongest stuff on earth. period. end of story. Dont even try to use something else...you may regret it.
6. Then I had Macho mount it to the wall. This thing is freakin heavy. I was kind of worried about it falling off and killing someone so I had him screw it directly through the clock face into a stud. Then I painted the screw and you cant even tell.
There you have it! This treasure cost less than $50.00 and I LOVE it!

 The birthday party planning is in full swing for my lil gal (I can't believe another year has flown by. I just want to keep her tiny for a few more years)! She's requested a princess party... so bring on the pink, glitter & tons of tulle!
 First I made a template (freehand) for each piece
 Using the templates, cut out tiara pieces
 Wrap your large felt piece around the headband. Run the glue along the center of the headband and press to hold the felt down. Next match up the two ends of the tiara and add glue to hold it in place. Glue down the rest of the tiara and cut off excess.
 Glue down the smaller piece of your crown and add rhinestone crystals
 I love how each guest will get her very own & original tiara!

.jpg)


