29 maio, 2010

Cabide super original para quarto infantil

Ready-to-wear Clothesline

  • empty star empty star empty star empty star empty star
  • Rate this craft
  • Rated by 7 members
Total Time Needed:
Afternoon Or Evening

Your little one wants to do everything, including getting dressed, by her "own self." To foster that spirit of sartorial independence, pick an outfit the night before, then hang it on a fun folk-art clothesline. It'll help keep your morning routine (and your beloved little dawdler) on track.


Ages: 2 years and up

Materials
  • Pencil
  • Yardstick
  • Acrylic craft paint
  • Screw-in knobs or pegs
  • Drywall anchors (if necessary)
  • Glue
X
Instructions
  1. Using a pencil and a yardstick, lightly sketch the posts on the wall (ours are 32 inches high, 3 inches wide, and 42 inches apart). Next, sketch a clothesline hanging between them at a height that your child can reach and add a little bird perched atop one of the posts (you can use our template).

  2. Paint over your sketches. When the paint is dry, attach screw-in knobs or pegs (use drywall anchors, if necessary) along the line. For greater durability, add a drop of glue to the knobs before screwing them in plac

vi aqui

21 maio, 2010

Passarinhos fofíssimos


Passarinhos para imprimir e montar aqui

20 maio, 2010

Mais de 400...


....seguidores.......


Estou super-feliz!


Um beijo enorme para cada um de vocês ,um abraço e...


18 maio, 2010

Postal para uma ocasião especial...

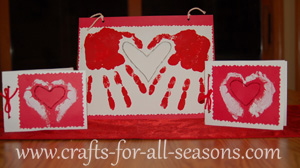
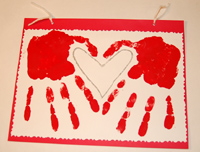
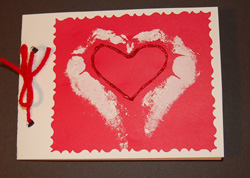
These handprint Valentines will mean so much and will be cherished for years. Nothing says “I love you” better than a homemade Valentine. This is a perfect project for a child to do at school, to make Valentine’s for their parents. They look beautiful with an adult’s handprint as well. The inside is open to your creativity. If you need help on what to say on the inside, check out the link on Valentine’s Verses and Sayings on the Valentine’s Crafts Page. Fingerpaints tend to work better than acrylics because the paint stays wet a little longer on your hands. For this project shown below, I used acrylic paints.

handprint Valentines


Things Needed:
  • Red and/or white cardstock
  • Fingerpaints, Poster Paints, or Acrylic Paints in red and/or white
  • A paper paint, or other dish to put the paint in
  • Red or white yarn
  • Glitter Glue
  • Scissors (fancy edged ones are nice too)


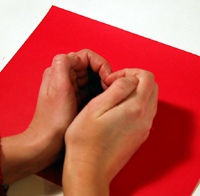
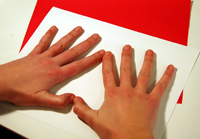
1. Begin the handprint Valentines by placing some paint in the paper plate and have your cardstock you want to stamp on ready. Then, dip your hands in the paint. See the diagrams below which shows you the hand placement needed to achieve the design. You may need to practice a little, or do a few of them until you find a heart design you are happy with.


hand placement to form small heart hand placement to form big heart


2. Once you have your designs stamped, set them aside to dry and go wash your hands.

3. When the designs are dry, you can add glitter glue to them to accentuate the heart. When the glue is drue, cut out the excess paper around them (called “cropping”). Fancy edged scissors make a nice touch but it is not necessary.

adding glitter glue cutting out edges of the Valentine


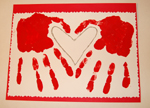
4. Mat your design on a the opposite colored cardstock. If you stamped on white, glue the white design on the red, and vice versa. If you used your whole hands to make the heart, the design is probably quite big and takes up most of the paper. To make this into a big card, add another piece of red cardstock behind it. The next step explains how to attach the paper together. If you used the sides of your hands for the small heart, you will probably have room to mat this design on a rectangular piece of cardstock that can be folded into a card.


Valentine matted on red paper


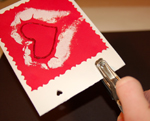
5. To attach the two pieces of paper together for the big card, you will punch two holes through both sheets. Then, you can thread yarn through the two holes to hold the two sheets together. This can be done to the smaller card as well, for a decorative element. To do this, measure along the edge you want to tie with yarn. Mark two dots, each about 1 inch in from the outer edges. Punch out these two holes with a paper punch.


punching hole


6. Thread some yarn through the holes and tie in a bow. This will allow the big card to flip open.

7. Your handprint Valentines are complete! The inside is open for your thoughts and creativity.

homemade Valentine Valentine craft


vi aqui

08 maio, 2010

Ilumine a sua casa ...

Descobri no http://vidapechincha.blogspot.com/ e mal posso esperar para experimentar...


Então vamos à democratização do conhecimento... rs.
Você vai precisar de cera (parafina), panela, água, bexiga, papel manteiga e palito.


1. Encha a bexiga com água morna e derreta a parafina em banho maria.
A temperatura ideal é de 180 graus (ou quente sem ferver).


2. Mergulhe lentamente a bexiga na parafina, sem ultrapassar o nível da água no balão, e retire também lentamente. Deixe esfriar um pouco e repita o processo mais algumas vezes.


3. Com a cera ainda quente, apoie delicadamente a bexiga na folha de papel manteiga para que forme um apoio no fundo. Mergulhe a bexiga mais algumas vezes na cera e repita o processo no papel manteiga até que fique uma espessura firme. Deixe esfriar por completo no papel.


4. Com a cera seca, estoure o balão com cuidado e deixa a água escorrer.


LINDAS : Rosas de papel


Vi aqui

07 maio, 2010

Livro Acordeão

Our first guest nesters! Jessie and Dee Lorimer gave me the instructions to make these adorable accordion-style books. They’re a little more complicated than my bound books, but they don’t require any specialized tools or supplies. Plus, they’re well worth the effort!

Mini accordion books

Supplies

  • 12- by 12-inch decorative sheet of paper (or fabric, wallpaper, etc.)
  • cereal box
  • glue stick
  • ribbon
  • 5 sheets of colored paper

Tools

  • scissors or paper cutter
  • ruler
  • pencil

1. Fold each sheet of colored paper diagonally into a square.

Cut off the excess and discard.

2. Fold each sheet again diagonally, then fold

side to side into four squares.

3. Glue the top left square of one sheet to the bottom

right square of another sheet. Repeat.

4. Fold accordion style. It’s impossible to explain this, so I hope this video helps…


5. Using a square as a measurement (4-1/4 inches),

cut two pieces of cardboard from the cereal box that are 1/2 inch larger (4-3/4 inches).

These will be the covers.

4. Cut two pieces of decorative paper about 3/4 inch larger than

the cardboard all the way around. Glue the cardboard to the center

back of the decorative paper. Then fold and glue each corner.

5. Then fold and glue the sides down.

6. Cut a piece of ribbon about 26 inches long.

Glue the center to the inside of one of the covers.

Glue 4-1/4 inch pieces of scrap paper over to secure (shown)

or 4-3/4 inch pieces of decorative paper (recommended).

7. Glue the colored pages to the cardboard by placing

the wrong side of the cardboard under the outermost squares.

8. Cut two pieces of decorative paper the same size as a square (4-1/4 inches). Glue these onto the outermost corners for a clean finish.

9. Glue your pictures, text, or scrap to each square (front and back).

10. Refold accordion style.

11. Tie closed with the ribbon.


vi aqui