 Tutorial aqui
24 abril, 2011
20 abril, 2011


09 abril, 2011
Pulseiras de Trapilho


it's simple, and it's perfect to dress up your bathing suit, or your cute summer covering with your flip flops in tow, or wear it with your cute summer dress while you dine eating fresh fish while watching the tide come in and the sun set.
*sigh*
i guess you can take the girl out of the beach...but not the beach out of the girl.
i'm counting down to my visit to so.cal. and i can't wait to actually wear my bracelet at the beach. but for now...i'll wear it even if there's snow and winds and i'm encircled by mountains.
lets get started:
*1st you will need approx three strips of jersey knit fabric cut to 1" each with the length of at least 58"
i found my my yellow jersey knit fabric here...my blue fabric at joann's, they have a large variety and you don't have to buy a whole yard of it, like i did. and my gray jersey fabric from robert kauffman
*2nd you will need your fingers. that's it, oh and a pair of scissors.
 how many fingers you use will determine how thick your bracelet will end up. i'll go into more detail on the 4 and 2 fingers...i'm assuming you can figure out 3 fingers! personally my favorite one is the 2 finger one...it's the perfect thickness in my eyes.
 okay...
*first you are going to take your 1" strips and cut on your ends a 1/4" slit.

 *next take your slits and line them up ends together like the picture above.
 *now take your bottom strip and pull it through the slits from TOP to bottom
 *gently pull till you get a little knot.
 now a lot of you will go back in time with me and totally remember doing this with yarn when we were in grade school or somewhere along that time. dont' know if it was a california thing cause i asked my friend who grew up in florida what i should call this and she was like "what are you talking about? i've never made those."
*with your connected strips we are now going to weave the strip in and out of our fingers.
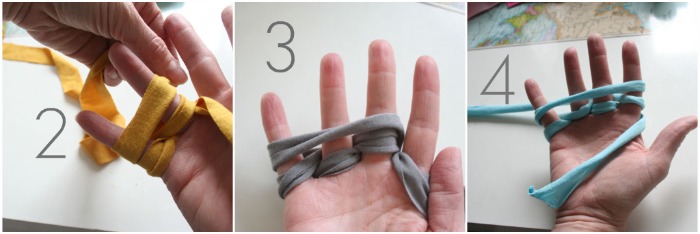
use the next set of pictures as a guideline (next set of pictures are for 4 fingers):
 start off with weaving behind the pointer, in front of the middle, behind the ring, and in front of the pinky finger.
 then wrap it around and behind the pinky, then in front of the ring, and behind the middle, and then in front of the pointer.
 *you should now have all fingers "weaved upon" (ha!)
 *bring one big loop around to face you (from the pinky to pointer)
 *take your weaved loops and go over your finger and big loop like the picture above.
 *continue to do so with all the fingers going in order.
 *when you get to the end, or at the end of your first chain (at your pointer finger) make a new loop and start the process all over again!
* once you get like 6 chains done, take your starting tail and gently pull (while your chain is still securely placed on your fingers!) so that you can get a good feel as to how long you need to make your chain, depending on your wrist size.
now let me show you real quick how to make a two finger chain then we will proceed on how to finish your chain and how to tie it off:
 **because you are using less fingers you will need less strips. i just used 2 strips when i made my 2 finger bracelet
*just like the 4 finger chain start with a small tail (of at least 4 inches)
*starting on your ring finger, weave behind (your ring finger) and then in front of your pinky.
 *then come back and loop back in front of your ring finger.
 *come back around from behind (from the pinky side) to the front to make a big loop.
 *repeat the steps i showed you while doing the 4 finger bracelet.
*remember to pull your tail so it makes the chain more defined and it gives you a better idea of how long you need to make your chain.
 *once you've determined you have a long enough chain, carefully pull the loops off your fingers, making sure you don't undo any of the chain by losing the loops!
 *slip the extra tail into both loops.
*pull all the way through, and gently tug the end.
 *tie off your bracelet with a knot.
 *cut off excess tails!
so by using 2, 3, or 4 fingers, you get:
 side view.
 and top view of thickness.
 and now you are so ready to hit the beach, pool, lake, or heck the grocery store. cause yeah, they are that cute.
Adorei!
Framed Carrot Easter Decor

Aside from the Canvas Bunny Buckets I shared a few weeks back, I had yet to create anything else Easter-related until this week. I had a few extra minutes during naptime a couple of days ago, so I decided to remedy that! This super-quick, super-easy framed carrot Easter decor is a snap to put together, and the bright colors exude spring! In 30 minutes to and hour, you can create one of your own with this step-by-step tutorial. So let's hop to it!
For this project, you will need...
Green and orange fabric
Fusible Peltex (a very heavyweight interfacing)
Coordinating thread
Dimensional adhesive foam dots
Craft glue
A washable ink marker
1 piece of yellow cardstock
1 pieces of white cardstock
Letter stickers
Black pen
(1) 8x10 frame
Basic sewing supplies (machine, shears, etc.)
step 1 / Iron your Peltex to the wrong side of your green and orange fabrics according the the product instructions. Use a marker to trace your carrot base and carrot top templates onto the interfacing side of your fused fabric (orange for the bases, green for the tops). Cut out all of the pieces.

step 2 / Use your washable ink marker to trace two little bunny-sized teeth marks onto one of your carrot base pieces. Trim away the excess. Now, head to your machine and edgestitch around the perimeter of each of your carrot base and top pieces. (This stitching is optional, but it really does make this project pop!)

step 3 / Trim a piece of yellow cardstock to 8 inches by 10 inches, and a piece of white cardstock to 5.5 by 7.5 inches. Place foam dots on the outer corners of your white cardstock piece, and adhere it on your yellow cardstock piece, taking care to ensure it is precisely centered. Use craft glue to adhere your carrot tops to you white cardstock, as shown.

step 4 / Apply foam dots to the back of each of your carrot base pieces, and adhere them to your white cardstock so they are centered over their respective top piece. Make sure to reserve the "chomped" carrot for the third place in line. Adhere letter stickers with your chosen sentiment (I used "Yum") just below the cut-out portion of your third carrot. If desired, use a black pen to create faux "stitching" all the way around your piece of white cardstock for added impact. Now, slip your creation into your frame.

All done, and (almost) good enough to eat!


Subscrever:
Mensagens (Atom)