


Vi aqui
 If only your man brought home fresh flowers for you every day?
 Well, show him a surprise and make your own NO-Sew flower bouquet!
 You only need a few supplies:
 To make a pretty bunch like this:
 So let's get started!
 Purchase round wooden dowels at your local craft store. You can do any size you want but mine were 3/16 in by 12 inches long. They're inexpensive. About $2 for a bag of 16.
 Cut strips of fabric approximately 2x16 inches (no rules here, do whatever size you'd like. This is the size I used)
 Then, with your fabric strip, wooden dowel, and glue gun....we'll make a flower.
 Bunch up the beginning of the flower a bit (this will be the center of the flower). Btw, I'm right-handed and found that it's easiest to hold the flower in my left hand and work the fabric around with my right. If you're a Leftie, do the opposite.
 Stick a dab of hot glue right in the center there and glue the end of the dowel to the center of the flower.
 Don't worry, the tip of the dowel won't show when you're done (unless you want it to! You can push it out more and add something to the top of it for a cool center. I just kept mine simple).
 Then, run a few inches of glue along the next section of the fabric,
 Like this:
 And carefully, oh so carefully (so that you don't burn your hands...which I did....a few times), scrunch bits of the fabric up and press it together at the bottom of the flower. It's like you're "ruffling" the fabric. Just keep doing this, bit by bit. Glue, gather, stick, etc. Until you've gone all the way around.
 And there you go! You should have a pretty blossom like this:
 But let's finish off that base....
 Cut a small FELT circle (any color you'd like). Doesn't need to be a perfect circle, just eyeball it. Cut a slit in the middle, a la Mrs. Pacman, like this:
 Then, glue and wrap the little felt circle around the base of the flower to disguise the messy glue and fabric:
 And you're done!
 Wasn't that E-A-S-Y? And really, pretty cute.
 Okay, let's try variations...
 You need to find something to make the dowels stand up while you spray them. Use whatever you have in the house. Nothing fancy. I grabbed a sponge from under the kitchen sink, poked tiny holes in it, and stuck the dowels down in each hole....
 Ta-Da!
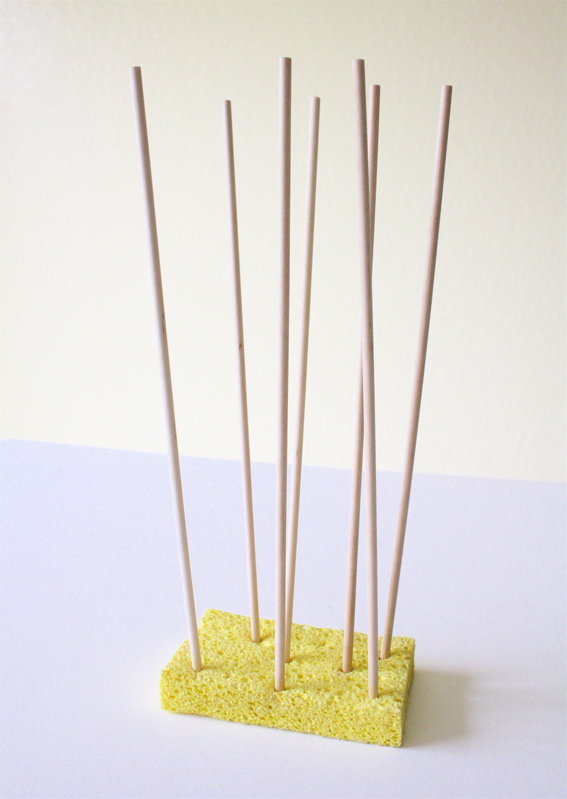 Okay, take your dowels to a good/ventilated "painting spot".
 And start spraying away. Make sure everything gets and even coat. Let them dry.
 The tips of the painted dowels will be left unpainted, so use that part of the dowel when you glue it to the center of the flower, so it's hidden:
 The orange really adds a splash of color:
 To create the "scalloped" look of the two flowers above, fold your fabric strip in half a couple times:
 Then cut a wavy pattern or scallops out of the one side:
 And glue it around the dowel. You can also trim the edges a bit when you're done to sculpt the flower even more.
 More ideas....
 Try a bright color at the base of your flower:
 Or oatmeal brown:
 And better yet, take your bouquet to the Mother's Day party with your family and friends....
 And give each woman her own bloom (with a little message attached).
 In fact, these flowers make the perfect "party favor" gift for any girly get-together. Or hey....make a gazillion of them for a Wedding! You'd probably want to enlist some friends to watch Seinfeld re-runs with you while you all cut, glue, and ruffle.

In the guest bedroom, I have a collection of white ceramic vases in all sorts of organic shapes on display.
So, my question to you: which one of these is not like the other? The answer? The one on the left. It’s a tin can.

I started by taking an old scarf, a tin can and some scissors. Just wrap the scarf around the can and trim off the excess material with a pair of scissors.

Snug as a bug. Use safety pins to tightly wrap the scarf around the tin can. It’s better to stretch the scarf material as tightly as possible around the can so it doesn’t budge. Tug and pull as hard as possible to get it to this point and you’ve got a nice snug scarf covered can.

Mix some powdered plaster with water until it gets to a creamy, yogurt-y kind of consistency. You want it to be runnier than you think, but not so runny that it doesn’t coat evenly and quickly. I know: the best way to figure this out is to play around with powdered plaster a few times until you get to know its quirks.

Smear it. Pour it. Spoon it. Just get the plaster all over the exterior of the can as quickly as possible. I find that rotating the can as you spoon on the mixture helps it flood other area of the can as you spoon. Twist, pour, spoon and repeat.

And one more time: let it dry for a few hours and you’ve got a ceramic-looking vase for your collection. Play with other textures, materials, etc. I am thinking of gluing shells onto the outside of a can and trying the same techinque to mimic the look of the vintage vases in the middle of the pic. Next plastery project for a rainy day.