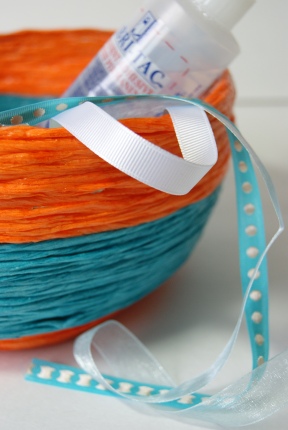
I love the Dollar Store, but really who doesn't? Me encanta el almacén del dólar, pero en realidad ¿quién no? But I know exactly why I love the Dollar Store. Pero sé exactamente por qué me encanta el almacén del dólar.

Raffia. Rafia.
Oh sure there are lots of other great craft supplies and random treasures that help fill my shopping basket, or two or three, but it's the irresistible raffia that draws me back time and time again. Oh, por supuesto hay muchos otros elementos para crear grandes tesoros al azar y que ayudan a llenar mi cesta de la compra, o dos o tres, pero es la rafia irresistible que me atrae de nuevo una y otra vez. The colours! Los colores! The versitility! El versitility! I could wax poetic about this string all day long. Podría cera poético sobre esta cadena durante todo el día.
Instead I'll give you a tutorial on one of my favorite creations to craft this amazing raffia into. En lugar de eso voy a dar un tutorial sobre una de mis creaciones favoritas para elaborar esta increíble en rafia.

Materials: Materiales:
- Balloons (round shaped) Globos (de forma redonda)
- 2 Colours of Raffia- you will need about 1/2 a roll for each 8 inch diameter bowl. 2 Colores de rafia-usted necesitará aproximadamente 1 / 2 un rodillo para cada recipiente 8 pulgadas de diámetro.
- Glue or Modge Podge Pegue o Modge Podge
- A bowl to put the glue/modge podge in Un plato para poner el pegamento / barrilete en modge
- Scissors Tijeras
- Something to protect your work surface- I use a piece of poster board Algo para proteger su superficie de trabajo-Yo uso un pedazo de cartulina
- A very patient husband to take pictures while your hands are covered in goppyness Un marido muy paciente para tomar fotos mientras sus manos están cubiertas de goppyness
 1. 1. Blow up the balloon until it has a diameter of about 8 inches. Infla el globo hasta que tenga un diámetro de cerca de 8 pulgadas. Fill up the bowl with a good amount of glue/modge podge. Llene el recipiente con una buena cantidad de pegamento / modge barrilete. You will be using alot of it. Usted va a utilizar mucho de ello. Smear a 2 inch wide strip of glue starting about 1/4 of the way down the balloon. Unte una amplia franja de 2 pulgadas de cola a partir de 1 / 4 de la distancia entre el globo.

2. 2. Unwind 8-10 inches of raffia at a time. Relájese 8-10 pulgadas de la rafia a la vez. Run it through the bowl and cover with glue, wipe off the excess with your fingers. Ejecutar a través del recipiente y cubrir con el pegamento, limpie el exceso con los dedos.

3. 3. Start to wrap around your balloon, making sure the rows are tight together. Inicio para envolver alrededor de su globo, asegurándose de que las filas están apretados juntos. Keep a hold of the balloon, it will roll away if you let go! Mantenga una retención del balón, se quitará si lo dejas ir! Try and tidy up your rows as you go. Trata de poner en orden su filas a medida que avanza. Keep unwinding the raffia in 8-10 inch lengths and running it through the glue as you wind it around the balloon. Mantenga desenrollar la rafia en 8-10 pulgadas y longitudes de ejecutarlo a través de la cola, ya que darle cuerda alrededor del globo.

4. 4. Continue with the first color of raffia until you have a band 2 inches wide or so. Continuar con el primer color de la rafia hasta que haya una banda de 2 pulgadas de ancho o menos. Cut off the string of raffia and unwind 8-10 inches of the second colour of raffia. Cortar la cadena de la rafia y descansar 8-10 pulgadas del segundo color de la rafia. Run the new raffia through the bowl of glue. Ejecute el rafia nuevo a través de la taza de pegamento. Twist about 1 inch of each colour together, tuck the tail under the row above. Twist cerca de 1 pulgada de cada color juntos, meter la cola en la fila de arriba.

5. 5. Continue with the second colour until you have a band about 3 inches wide. Continuar con el segundo color hasta que haya una banda de aproximadamente 3 pulgadas de ancho. Change back to the first colour, twisting the ends together and tucking the tail in under the previous row. Cambiar de nuevo al primer color, torciendo los extremos y metiendo la cola en virtud de la fila anterior. Continue with the first colour all the way around the balloon. Continuar con el primer color todo el camino alrededor del globo. The bottom can be a bit tricky, it helps it you hold down the rows with your fingers as you wind the next one. El fondo puede ser un poco complicado, que le ayuda a mantener las filas con los dedos a medida que el viento la siguiente.

6. 6. Smear a generous layer of glue over all of the raffia. Extienda una capa generosa de cola sobre toda la rafia. Lightly go over it with your finger to remove excess. Ligeramente repasarlo con el dedo para eliminar el exceso.

7. 7. Tighten up the lines, try to make sure you get glue into any holes left between the rows. Apriete las líneas, trate de asegurarse de obtener pegamento en los orificios que queda entre las filas.

8. 8. Use a wire hanger to create a hanging device. Utilice un gancho de alambre para crear un dispositivo de suspensión. Poke one end of the hanger through the nipple of the balloon, wrap the middle of the hanger around a curtain rod and tack the other end to the ceiling. Poke uno de los extremos de la percha a través del pezón del globo, envuelva el medio de la suspensión de alrededor de una barra de la cortina y limpie el otro extremo al techo. Ignore the looks of disbelief your husband will cast your way. No haga caso de las miradas de incredulidad de su marido echará a su manera.

9. 9. Wait 6-8 hours, and the outside will have mostly dried. Espere 6-8 horas, y el exterior tendrán su mayoría secos. You will be able to tell because it will look clear instead of white. Usted será capaz de decir, se verá claro en lugar de blanco. Take the bowl down. Tomar la taza hacia abajo.

10. 10. Pull the balloon out. Tirar el balón fuera. Sometimes you have to pop them, sometimes they will have started to deflate (like mine). A veces usted tiene que estallar, a veces se han empezado a desinflar (como el mío). Tidy up any extra bit of dried glue. Ordenar las poco más de pegamento seco. You will be able to see that the inside is till wet. Usted será capaz de ver que el interior es hasta húmeda.

11. 11. The weight of the raffia will have pulled down the shape of the bowl. El peso de la rafia se han encasquetado la forma del recipiente. This works perfect for our project. Esto funciona perfecto para nuestro proyecto. Rest the bowl on a work surface and press down gently. Apoye la copa sobre una superficie de trabajo y presione hacia abajo suavemente. Your aim is to flatten the bottom so that the bowl will sit nicely when dried. Su objetivo es aplanar la parte inferior para que el cuenco se sentará muy bien cuando se seca. Leave it a few days to fully cure and then enjoy your gorgeous new bowl! Déjalo unos días para curar por completo y luego disfrutar de su nuevo recipiente magnífico!

I use mine in my craft room as a little catch all. Yo uso la mía en mi habitación la artesanía como una captura poco todos. When I'm in the middle of a project I like to throw all of the stuff I'm using in one place and put it back into its proper home later. Cuando estoy en medio de un proyecto que me gusta de tirar todas las cosas que estoy usando en un lugar y lo puso de nuevo en su hogar adecuado después. That way I don't have to stop what I'm doing and loose my crafting mojo, plus if I need it again (which is usually likely to happen) it's right at hand. De esta forma no tengo que dejar lo que estoy haciendo y perder mi mojo artesanía, además de si lo necesito otra vez (que generalmente es probable que ocurra) es la derecha en la mano.

You can also use the same method to create a simple fun mobile. También puede utilizar el mismo método para crear una simple diversión móvil. I made this one for my niece when she came to visit. Hice esta prueba para mi sobrina cuando ella vino a visitar.
Blow up three balloons of different sizes. Blow up tres globos de diferentes tamaños. Cover the whole balloon with the raffia. Cubra el globo entero con la rafia. To keep the shape dry these resting on their side on a garbage bag at first, be sure to turn every now and then to stop it from sticking. Para mantener la forma seca estas descansando sobre su lado en una bolsa de basura en un primer momento, asegúrese de desconectar de vez en cuando para evitar que se pegue. String together and secure to the ceiling. String juntos y seguro hasta el techo.
vi aqui


