25 setembro, 2010

Uma almofada LINDA!

Recycled Roses Pillow Tutorial


Instead of changing the color of the floors (except the hallway) I decided to change the color of the pillows on the couch- we have white floors and a big white couch and with LOTS of pillows and the easiest way for me to change color is with all the pillows. This project is a little time consuming and will take a while for me to complete (we have about 8-10 pillows!!) but I wanted to share one of the ideas I had for a pretty spring pillow using all the flowers I had leftover from this project.


I had all kinds of flowers left over from the wreath I made from recycled roses and I thought they would make a great accent pillow for the couch. To make these roses read this post


I started by cutting a rectangle from plain white muslin and then lined it with interfacing.


Use the sewing machine to "draw" whimsical stems and leaves.
If you don't have a sewing machine, you could also hand embroider stems or if don't sew- you could use fabric paint to paint stems on the surface


Once satisfied with the surface, add the rose to the top of the stems.


Use a needle and thread to sew the roses to the surface.
I'm not going to lie- this is really time consuming but very worth it in the end!


Sew the front of the pillow to a back-
because I LOVE the stitching showing I used green thread and a zig zag stitch on the edges.


Leave an opening, insert stuffing and sew closed.


Oh so pretty!!!

vi aqui

Decopatch

24 setembro, 2010

Uma ideia giríssima...

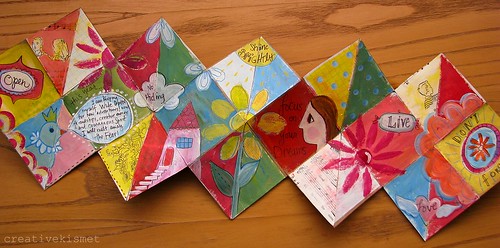
paper bag inspiration booklet
A few people asked if I would show how we made our caterpillar book. No problem, because the whole reason I started trying to figure it all out, was so that I could keep a little inspiration book in my purse.
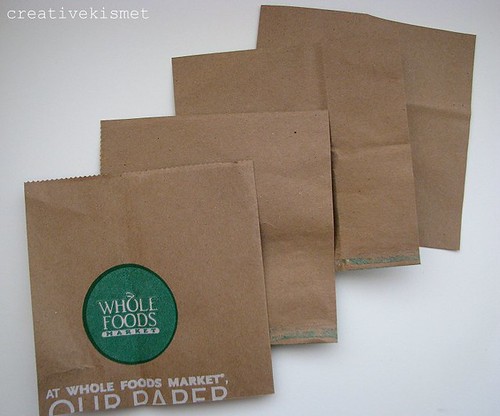
I made mine out of a paper bag, because I knew I was going to paint it and the brown paper holds paint well. Any kind of paper can be used–scrapbook paper, text weight paper, cardstock…
1. Cut paper into 4 x 4 inch sheets. The end booklet will be 2 x 2 inches. Any size will work, as long as it is square and all sheets are the same size. You can make the booklet any number of sheets. I will show how to put 2 together, but my end result is 5 sheets long.
2. Fold each sheet in half both ways and in half diagonally. Pull diagonal fold inward as seen in photo. Repeat with all sheets.
3. Glue sheets together, with glue stick, so that one sheet folds inward and the other outward. Continue adding more sheets if desired.
4.Fold booklet closed, carefully creasing each fold with your nail or bone folder.
5. Open and decorate whatever way you see fit.
Here are some other ideas in case painting isn’t your thing:
* Make one to tell a story. Write your birthing story, engagement, or something totally made up.
* Make a mini photo album. This would be a great gift for the grandparents.
* Make a birthday or anniversary card.
* Keep it blank and make lists and/or doodles.
* Make it inspirational. Add photos, quotes, images from magazines

daqui

19 setembro, 2010

Útil e bonito...

Over Under, Over Under

Cup_and_coaster


When we were visiting the gallery the other day, we learned they were offering a free weaving class hosted by Minnesota artist/instructor Becka Rahn. To my chagrin, I've never really been excited about weaving. I tend to pursue crafts that are not only creative and beautiful, but have a practical aspect as well. Weaving, to me, meant wall-hangings, and, well, I just don't need a wall-hanging. But, we've enjoyed getting out lately and this was a free class for the family, so I thought, what the heck, let's go ;) Well, we had so much fun and Becka showed us such an easy technique that I must say I'm now a convert. I still don't need a wall-hanging, but I've discovered there are many other practical uses for weaving, i.e. rugs, place mats, coasters, etc. I thought I'd share with you the technique we were taught. This is appropriate for any beginner (there was even a 3 1/2 year old at the class).

::Materials::

yarn, as many colors as desired
styrofoam tray (like a meat tray)
scissors
masking tape
something to use as a shuttle (a popsicle stick, a bone tool, etc.)
large plastic needle

1. Tape one end of yarn to the backside of the tray at the bottom corner as shown.

Tape_to_back

2. Wrap the yarn around the tray, back to front, until the whole tray is wrapped. Try to make the wraps equally spaced apart and finish with an even number of wraps. In this photo, I've wrapped around 8 times.

Wrap_and_tape

3. Turn the tray over to the front. The parallel lines you've just created is the warp. Now, cut some yarn about the length of your arm. You can use a new color or keep it the same. Tape one end of the yarn to your "shuttle". In the class, we used popsicle sticks, but at home I used one of our clay sculpting tools.

Tape_yarn_to_shuttle

4. You're ready to start! Place the shuttle over or under (doesn't matter which) the first yarn and continue going over/under pulling the yarn through. Leave a nice sized tail.

Under_over

5. If the shuttle finished by going over the last yarn, then go under the same yarn when you return and vice versa.

Leave_a_tail

6. The yarn being woven through the warp is the weft. When you've used your length of yarn, cut, leave a tail, and tape on a new piece of yarn. Anytime you want to change colors, use the same technique. Again, if the shuttle finished by going over the last yarn, then start the new yarn by going under. If you finished under, then start by going over.

Need_new_yarn_2 Start_opposite

7. Here, I'm changing yarn colors. I'm using a bone tool as a shuttle and instead of taping the yarn, I'm just tying it through the hole.

Bone_tool_as_shuttle

8. I'm finished with the weaving part.

Weaving_finished

9. Turn the tray over and cut the thread through the center and un-tape the ends to release your weaving.

Cut_across_back

10. Now, you're ready to tie up all those loose ends!

Ready_to_finish

11. Knot off the warp ends (the ones on the top and bottom) by tying in pairs.

Tie_ends

12. The knot-tails can then be threaded through the weaving using your plastic needle. Don't do this step if you want to leave the threads for fringe.

Threading_knots_and_tails

12. Next, thread your plastic needle with a tail from the side and thread it through the length of the weaving. Continue until all tails are nicely tucked in.

Thread_tails_into_weaving

13. All done!

All_done

Now, to give it a practical purpose, how about a nice cup of tea using your new woven coaster ;)

Cup_and_coaster

Vi Aqui

Flores Docinhas

Tasty Posies for Valentine's Day

Dum Dum flower posy
Our homeschool group is making Valentines for the local senior center and Meals On Wheels. The kids and I are contributing 70 of these little tissue paper/lollipop posies that we made. Here's how we did it...

Supplies:
tissue paper in a variety of colors
Dum Dum lollipops
floral tape
scissors

Dum Dum posy

You'll need circles of tissue paper measuring 4-5 inches in diameter (doesn't have to be exact). We did this by cutting squares first, then rounding the corners to make circles.
Round the corners

We used a layer of 3 tissues per flower, you could use a couple more if you're so inclined.
Sets of three

To find the center of the circles, fold the set of three lightly in half first, then fold again to quarters. When you open it up, there'll be a little creased X in the middle.
Fold in half Fold in quarters to find the center

Poke the Dum Dum lollipop through the creased X.
Poke through the center

Gently gather the tissue at the top of the lolly, going slowly so as not to tear the tissue paper. Squeezing the paper at the top makes more wrinkles in the paper and looks more "petal-ish" when finished.
Squeeze 1 Squeeze 2
Squeeze 3 Squeeze 4

Pinch the base of the lolly really well and tight, so the floral tape can go on snugly.
Pinch the base well Ready for floral tape

Have you used floral tape before?
Floral tape

It can be a little tricky, but once you get the hang of it, I think it comes in handy for a lot of craft projects and gives things a nice finished look. You can get it in craft stores in green, white or brown depending upon your needs. Be sure to catch the tissue paper in the tape as you start. Just stretch a bit (1/2 inch?) at a time, wrap, stretch, wrap... going tightly down the stick at a diagonal. No worries if it tears, just press it on where you left off and continue to the bottom. Tear at the bottom when you're done. The kids did all the other work and I did the floral tape. Getting it nice and tight at the base keeps the tissue paper petals from getting too floppy.
Floral tape 1 Floral tape 2

Gently separate the paper petals and tweak until you have the flower shape you want.
One finished, 69 to go Yummy center

I think they look like poppies!
Bouquet


Vi Aqui